Wednesday, December 5, 2007

Inserting symbols in Word, continued

Recently I wrote about inserting symbols in Word using the Insert symbol function. I also mentioned that there are keyboard shortcuts for some common symbols, like © (copyright symbol) (ALT+CTRL+C) and it's well worth learning them, it can really save you some time! Here are a few more:

® (registered trademark symbol) - ALT+CTRL+R
¢ (cent symbol) - bit more tricky, hold CTRL and press /, then press c whilst still holding CTRL!
° (degree symbol) - hold CTRL and press @, then press space

By the way, these can depend on what keyboard you have - mine is not an English one, so to get @ I have to press shift too!

But we still haven't got onto those symbols that are inserted with ALT+xxxx (a four digit number) - we'll leave that for next time!


Monday, November 26, 2007

How do I convert a PDF to a Word document?

In my translation business I often get PDF files which the customer wants translated and returned identically-formatted. The only way I can do this (partly because of the software we use to help us in translation) is to somehow convert the file to Word format and do the editing/translating there, and then convert back to PDF if necessary.

You probably have a similar situation, where you have a PDF file that you need to convert into a Word file so you can then continue editing the document in Word for whatever reason, and you want formatting preserved.

I have decided to test VeryPDF's PDF to Word software, one of the solutions that are out there for converting PDF files into Word documents, and see how well a product like this really works.


What I decided to do was get a PDF file and try converting it with PDF to Word to see if it really does the job. I opted for a really exciting document, the British Government's SA-100 tax form, which is full of nice formatting which ought to trip up the program. Here is a snapshot of the file (this is from page 2, click for full size):


The easy way
Of course, you could just open the file in Adobe Reader and copy/paste the text into Word. So let's try that.

You basically get an unformatted text file, like so (click for full size):


As you can see, it's next to useless - there is no formatting preserved and you would have a real job trying to reconstruct the original document from this.

Now, if Adobe Reader had an option like Save As -> Word Document... That would be nice, but they want you to buy the full Acrobat software for that, costing 100's of dollars! And having used it in the past, I was not overly impressed with its export to Word function, though this may have improved.

The VeryPDF way
I downloaded trial versions of several PDF converter programs, and they all did the job fairly well, but I eventually decided to demonstrate VeryPDF's, mainly because it offers a fairly generous trial period - 99 tries and only a 5-page limitation in trial mode. Some of the other programs (such as this one) seemed to do a good job, but obfuscated the results with asterisks and stuff. I understand they need to do to ensure sales of the full version, but it was very annoying and did not allow me to properly trial the program. VeryPDF's PDF to Word software is very easy to use so I won't go into details - all you have to do is select the source PDF and name the target Word file and in a few minutes the job is finished. And here is the result (yes, this is a screenshot of the resulting Word file!):


I am impressed - I honestly wasn't expecting it to be that good! I expected some bits of the PDF to be converted to graphical elements in Word but they were not - every bit of the text is editable, as far as I can see. And the actual formatting is perfect. The only issue is the main font, where it didn't use a sans-serif font. I guess this is because the font was not a standard Windows one, and this little glitch may be fixable through the options, though I couldn't find anything like that.

Also, of course, the results would be a lot different if the document contained scanned text. I can't show you the results of this because I tried it on a confidential document, but you should know that this program does not appear to OCR text that is in the form of a bitmap.

All in all though, these are small niggles and I was most impressed with this program. I will have to seriously consider buying the full version as it could give me a huge competitive advantage to be able to supply the customer with a translated AND fully-formatted Word/PDF document. At only $35, the product would pay for itself very quickly

Buy the PDF to Word converter here.

Saturday, November 24, 2007

Symbols in Word

OK, reaaaaally simple, but it's amazing how many people do not know this. You often have a situation in word where you want to use a symbol that is not represented on the keyboard. For example ¥ (Japanese Yen), © (copyright) or ยต (Greek symbol micro-).

There ARE keyboard shortcuts to get these symbols, but your first port of call will probably be the insert symbol function (just go to Insert and choose Symbol).

You will be offered this grid of symbols which are contained within the font you are currently using, though you can choose another font from the drop-down menu, e.g. one of those Dingbats type fonts:

Just double-click on the symbol you want and it will appear in your text at the current cursor position. You can also see the list of recently-used symbols below the main grid, which will probably be a quicker way to find the symbol you are looking for.

Symbols Shortcut Key
You will also notice that you can define a shortcut key by pressing the button that says... shortcut key! But most of the major symbols already have a predefined shortcut key. For example, the copyright symbol is inserted by pressing ALT+CTRL+C. However, in this example, the Yen symbol is inserted by pressing a strange looking combination, ALT+0165. If you don't know what this refers to, then stick around because we will give you a quick explanation in a future article.

Happy symbol-inserting..!


Wednesday, November 14, 2007

Using speech recognition in Word

WORKING speech recognition in Windows, with Dragon NaturallySpeaking! Buy now!

I have to briefly rave about this discovery, even though it's not directly related to Microsoft Word! Just watch the video and you will get the gist of it!


Must be a trick!
Amazing, huh? Now, I have been using this product, Dragon NaturallySpeaking 9 by Nuance, mostly in Microsoft Word, for a couple of weeks now, so I can give you a quick low-down.

Well, in short, it really does work just like in the clip! Okay, so the people you see in the video are quite proficient in using the program, but the speech recognition really does work that quickly and accurately! It has really revolutionised my use of Microsoft Word - I'm involved in the translation business and for us, time, or rather typing speed, really is money. But there is an upper limit to how fast anyone can type, especially if they are a translator, since translators are not usually professional typists. Even for those who do type quite fast, like me, the hours per day we need to spend typing at high speed really do take their toll on our finger joints.

Dragon NaturallySpeaking has drastically reduced the amount of typing I need to do and now my most common bottleneck is the actual thought process involved in writing text, rather than the limit imposed by typing speed, which is how it should be!


What's the catch?
Of course there are downsides. Although Dragon NaturallySpeaking has an exceptional dictionary, it cannot possibly cater for all possible proper nouns that one might wish to type. So for example in a historical text, you are likely to encounter the names of people, places and events which DNS simply can't cope with. You will probably need to enter those manually, though you can program in new words, which DNS then recognizes perfectly. It's just a question of whether you feel it's worth taking a few seconds (it's that quick) to train the new word, or just type it the few times it appears.

Obviously, although you can talk very quickly when using the program, you do have to enunciate quite clearly, and any time you stumble over a word (which is quite often in my case) DNS gets confused. Also, I have a cold at the moment, and this has slightly affected accuracy!

Conclusion
This is not intended to be a full-blown review, I just want to open up the possibility to you of using a speech recognition program such as Dragon NaturallySpeaking. Maybe you tried this program, as I did, a few years ago, and weren't very impressed. Now all I can say is, buy a decent microphone, make sure you do some of the training routines after installation, so that the programme is calibrated to your voice, and give it another try! I think you will be blown away!

For the first time, it really occurs to me that we could be seeing the beginning of the end of the keyboard as a practical data entry device! I have no hesitation in recommending this amazing software, and at $160 for the standard version, it is a bargain! In my job, the increase in productivity that it brings means it could pay for itself in less than a week!

Now you just have to think about how you are going to keep the people around you quiet while you are trying to type, or rather speak!

P.S. Oh, I forgot to mention, this whole article was written using Dragon NaturallySpeaking. With the exception of a few minor corrections and alterations, the entire text was spoken by me and recognized by DNS.

P.P.S. There are several versions of Dragon NaturallySpeaking. Standard, Preferred and Professional. Preferred is the most popular, and the one you will probably go for. Standard is a somewhat slimmed down version that seems to be intended for family use, while Professional is a fully featured, quite expensive version, with advanced scripting facilities which you would need to know why you need. Unfortunately, there does not appear to be a demo version, but I believe on-site demonstrations are available for potential corporate customers.

Friday, September 28, 2007

How do I get rid of "limited menus" in Word?

This is a real pain in the neck and I thoroughly recommend this be the first option you change when installing Word 2003 for the first time (no longer applies to Word 2007).

You know what I am referring to? The drop-down menus like File, Edit, View etc. are abbreviated by default - set to only show SOME of the options on them, with a chevron at the bottom to show FULL options:


Somehow, this is supposed to HELP you, by not overwhelming you with options and only showing the ones you use most often. Trouble is, it never seems to show quite the ones you need, so you are forever having to click the "more" chevrons to get the rest of the options. Unless you are a total beginner in Word, this is just a pain in the neck.

To turn this off, right-click the mouse somewhere on the drop-down menu bar (i.e. where it says File, Edit etc.) and then choose the Customize option at the bottom. Choose the tab, and there you will find an option Always show full menus. Tick this, and Bob's your uncle! You will always be presented with ALL drop-down menu options and you need never be patronised by Word again. Erm...

Wednesday, August 29, 2007

Highlight whole document from or to a certain point

OK - another tip about highlighting using the keyboard in Microsoft Word (and other Windows applications). This is really handy!

So you need to highlight (i.e. mark for some subsequent purpose, like copy/paste or something) some of a document, which is maybe 500 pages long. You only want to mark the first, say, 240 pages, or the last 110 pages. What do you do, position the mouse at page 240, and move it up the screen, scrolling through all 240 pages until you have marked the whole document? Do you know how long that can take?! I know you know, because we've all done it! It could take HOURS of scrolling! There is a MUCH simpler and quicker way.

Scenario 1
I want to mark the first 240 pages in my 500 page document. I move the mouse pointer to the point TO which I want to mark my document, somewhere on the 240th page, and left click to position the cursor. Then I press:

CTRL+SHIFT+...guess what? HOME

and voila! My whole document is marked, from the top right down to page 240. And it took about 14 milliseconds, not 14 minutes!


Scenario 2
I want to mark the last 110 pages of my 500-page document. Instead of starting at page 390, and scrolling laboriously down for minutes on end, I simply go to the page from WHERE I want to start and press (now I just know you've guess it already):

CTRL+SHIFT+END

...and suddenly the last 110 pages are highlighted and ready for whatever it is you want to do with them!

Don't make it difficult for yourself! Keep reading Word Tips World for more of the same! Or just buy a copy of Office for Dummies (see above) if you can't be bothered!

Tuesday, July 10, 2007

Synonyms in Word - say the same thing differenly

The English language is blessed with a staggering number of words! I mean, there are a LOT of them! No-one really knows how many, but it is likely millions. Forget what anyone says - I once heard someone claim that the Eskimo language had more words than the English language, which is at least two fallacious urban legends rolled into one - the English language has more words than any other language, full stop.

However, most people just do not use enough of them! That is why Word's synonym feature is so incredibly useful, especially if like me you do a lot of creative writing or translation.

Why use the word "nice" (which should be banned anyway) in a composition, when you can use "pleasant", "good", "kind", "polite", "fine" or "lovely"? Or use "hot" when you can say, "burning", "scorching", "boiling", "blistering", "sizzling", "searing"?

You should have a synonyms dictionary or thesaurus close at hand when you are working, but Word's synonym feature makes it much quicker to substitute a different word to the one you were planning to use! And as far as I know this feature is available for other languages too, provided Word has a dictionary installed for that language.

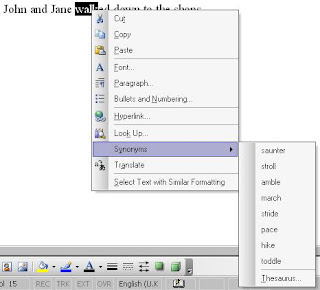
It's easy to use - as you are typing, simply highlight the section of the word you want a synonym for (not necessary if you want the full word, but it doesn't work that well with past tenses etc.) and right-click.

The resulting context menu has a Synonyms option and, navigating on, you will be presented with a sub-menu with a list of synonyms. Choose one and the word will be replaced with the synonym! Hey - as we like to say here so often - presto!


A few provisos:

1) the best use of this facility is when you already know the words that Word suggests, but just couldn't think of them! It is a great reminder, but I wouldn't recommend you simply use any word that sounds good - you could end up sounding stupid, and nobody wants that!

2) the Synonym does NOT appear on the context (right-click) menu in certain, well, contexts. For example, if there is a spelling or grammatical mistake, underlined in red or green, then it will first want to correct the mistake before showing the Synonyms sub-menu, which can be annoying if the mistake is not really a mistake, like an uncapitalised first letter which you WANT that way.

3) as mentioned earlier (in parentheses, now THAT is bad style!), forms other than the basic, infinitive or singular form of the word are not always handled that well. In particular, when you have a plural, say theories, it will suggest "theory" as the synonym, which is a bit strange. So you may at times need to type in the basic form of the word and then right-click it.

I use this synonyms feature a GREAT deal! It does not imply that Microsoft somehow has a better grasp of the English language than I do. Rather, this is a little bit of help in unlocking all those vast stores of passive language you have up there in your brain/mind/noggin/grey matter.

Friday, June 8, 2007

Get rid of that annoying horizontal line in Word

Have you had this happen? It especially likes to rear its irritating head in other people's documents that you receive.

I am talking about a mysterious horizontal line that appears in the middle of your Word document, like I had recently in a document I was working on. In this case, I had scanned the page in, and the optical character recognition (OCR) program had put it in there itself.


It's not a regular line, drawn with the graphic tools, you can't find any option for it in the menus, right-clicking on it does nothing, and when you pass the mouse over, it merely gives you the slider pointer icon, used to indicate that you can move it up and down.

Well, no need to tear your hair out! This line is actually... Wait for it...! A border! Don't ask me how it got there, but all you need to do is highlight the section around the line (just left mouse, and pull a nice big block round the area, provided there are no tables nearby where you want to preserve a border). Then just go up to the border-line selection icon in the toolbar and choose the one that clears all borders:

Hey presto (I say that a lot round here!), that pesky line should disappear! If it doesn't then, well, blame aliens!

Friday, June 1, 2007

Highlight any square block of text in Word using ALT

Now this tip is really nice, almost like magic if you have never used it before!

Normally when you use the mouse to highlight text, it will automatically highlight sentences and paragraphs across the screen, like this:

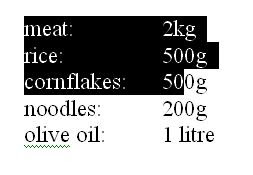
But you don't want it to do that, especially in a case like this, where you have two columns separated with tabs (though this is not the best way to format this text!!). You want to select a square block which will, say, only highlight one vertical strip of text, like this:

This is easy to do! Just press ALT and hold it down, then select using the left mouse button like you normally would. You will find that instead of Word "snapping" to words and whole lines, it will highlight a rectangular section of any size and dimensions you want, as in the picture above! Then you can copy and paste just the vertical section you have anywhere you want.

You can even cut a section right out of the middle of a text. Say, from the above paragraph, like so:

Just press ALT and hold it do

mally would. You will find th

will highlight a rectangular se

ure above! Then you can copy

I am sure you would know why you wanted to do that! This tip is incredibly useful though - yet another Word Tip from Word Tips World, designed to get you up there with the pros! Be sure to let us know if you found this tip useful, and what you used it for!

Wednesday, May 30, 2007

Highlight individual letters not a whole word

Just a quick tip to answer a question by an anonymous reader - how to stop Word automatically highlighting the whole word when you just want to highlight part of it?

Well, for this tip I think there is no choice but to use the mouse (though see this post about highlighting without using the mouse). The reason Word is highlighting whole words instead of individual letters is probably because of an option here:

Tools -> Options -> Edit [tab] and uncheck When selecting, automatically select entire word option and press OK.

This should do the trick - now you ought to be able to use the mouse to highlight individual letters.

Friday, May 25, 2007

Forgot to save my Word Document!!

Last updated: 14th April 2010
This is a post following on from a previous article called Good Word Habits - Save Save Save! and aims to try to help you if you didn't follow the advice in the article.

In other words, you forgot to save your Word Document or accidentally deleted it!! Arrghhh! OK, it happens to us all at some point - there are other creative ways of losing a Word document too, I might share them with you sometime! But you want to know what to do if you forgot to save that document you spent 4 hours on!

OK, first I have to prepare you for something. I think you need to swallow, digest and accept this fact now before we get into any potential solutions:

Your Word document is probably lost forever.

Please go back and read this statement again and reconcile yourself to the probable fact that if you closed down Word without saving your document even once, there is no way to get it back. Face that awful fact now, and then if we DO manage to do anything to get it back it will be a pleasant surprise. OK?

How to maybe get your document back
How do people usually lose their documents, and what are the options for retrieving your valuable file? First, before you do anything, as one visitor pointed out, check your Recycle Bin! You never know, if you simply accidentally deleted it, it might actually have served its purpose for once! Be on the lookout both for .doc files, and .asd files, as described below in 3.i). Heck, even look out for a .tmp file in there, these get saved by Word too and there might be something salvageable in one of them. But here are the typical scenarios, if this doesn't bear fruit:

1) SCENARIO: Forgot to save the document at all, even when exiting Word/closed Word without saving! This is the worst case scenario - when you worked for minutes or even hours in Word without EVER saving the document even once, hence it still bears the name Document1. When you exit Word it will always ask you whether you want to save the document and, without thinking, you press NO.


To the best of my knowledge
, if you press NO at this point there is no way to retrieve the document (I will GLADLY be corrected on this point)! Word assumes, fairly reasonably, that you do not want it anymore and deletes it both from any temporary files and the Autorecover file that it may have been saving regularly while you were working. And it's no good looking in the Recycle bin, because it won't be there either.
SOLUTION: weep quietly, or try some of the following solutions in case you got very very lucky.

2) SCENARIO: Computer, Windows or Word crashed while you were working before you had time to save. You may not have saved the document at all, or you did save it, but not a recent copy.
SOLUTION: This is a much better scenario - Word should be set up to regularly save your document using the AutoRecover feature, and (as of Office 2003, or maybe one before, I can't remember) when you restart Word, a panel should appear at the side of the screen showing which documents you were working on when the crash happened. You should look at the time saved to check to see which is the more recent saved version of your document - is it the one YOU saved (if you saved at all), or the one AutoRecover saved. Click on the file and save it under a different name, just so you are sure you have a salvaged version.
In the examples, the last versions saved of these two documents were both saved by me, since Autorecover is usually set up to save every 10 minutes (Tools -> Options -> Save tab -> Save AutoRecover info every: [choose your interval]). So remember, you are ALWAYS going to lose all your work done AFTER either a) your last manual save or b) the last AutoRecover save, so make sure one or the other is frequent!

3) SCENARIO: I haven't managed to recover my document using the above suggestions - HELP! Like I said, I hope you are reconciled to the probable loss of your document and that you will take my advice to save, save, save in future. Also, it wouldn't harm to have a backup solution in place that helps prevent you losing files by making regular, automatic backups to an online service, so you don't even have to think about it. I wrote about one such backup service here, check out the article. Otherwise, you could try one of the following:

i) Look under Tools -> Options -> File locations tab in Word and see where Word saves its AutoRecovery files. By default it is something like: DRIVE:\Documents and Settings\[your windows username]\Application Data\Microsoft\Word\
In that directory there MAY be some files with the extension .asd which are really just Word files. If by some amazing chance Word didn't delete the temporary file, it may be there called AutoRecovery save of... [your filename]. Simply copy it to somewhere safe and rename it with a .doc extension instead of an .asd extension and it will load fine into Word. Frankly though if you find your file this way someone must be smiling on you, because like I already said, Word deletes those files if they are not claimed before Word is closed...

ii) Try a specialised "undelete" tool, like WinUndelete, which will also help you if you accidentally deleted the file. You will have to shell out a bit of money, but it is a product that ought to pay for itself, because it will deal with all kinds of lost files, not just Word files. However, although I am happy for you to buy WinUndelete through my site, because I get a few modest pennies in commission, I have to be frank and say there is no guarantee that this will recover your file. Word just seems to obliterate the file you were working on. All I can suggest is, give the trial version a go and see if it saves your bacon - I believe it lets you search for lost or accidentally deleted files, but only the full paying version lets you actually recover them, which is fair enough I suppose, you can see if your file is there without actually paying for the software.

That about wraps it up. I am sorry to paint such a bleak picture, but I think it is realistic. If you have any additional tips I will be happy to hear them and include them, but the message once again has to be save, save, save! And if you have trouble doing that, this suggestion on how to stop losing files may help you too.


Also, you could try to recover lost or accidentally deleted files with WinUndelete

Tuesday, May 22, 2007

Using Home and End to navigate

Another much-overlooked function, which again is available throughout Windows not just in Word, is the use of the Home and End keys to navigate around a document.

Once again, if this is blindingly obvious to you, then feel free to move on! But even as an experienced user of Word, I did not get into the habit of using Home and End till fairly recently!

It's simple:

Home takes you back to the beginning of the line you are on
End take you to... wait for it...! You've guessed, haven't you!

This can save you lots of time or needless keypresses. I use it when I have had to go back in the line of text I was working on to change something (skipping words with CTRL, of course) and now I want to return to the end of the line again and continue typing. One press of End and you're there!

Advanced stuff:
Once you have got into the habit of using these keys, try them in combination with CTRL.

CTRL+Home takes you to the beginning of the entire document
CTRL+End takes you... Well, I won't insult your intelligence

Why not give these shortcuts a try now, and see how quickly you get into the habit of using them?

P.S. Apologies to subscribers for the recent lack of Word Tips - my excuse is a big cycling trip around Serbia. Mobile bike blogging took it all out of me!

Wednesday, April 25, 2007

Word 2007 drop-down menus - GONE!

UPDATE: I am still in two minds about the new "ribbon" menu in Word 2007 - I have personally found it easier to use in some ways, but I am very proficient in the use of Word 2003 so it takes some getting used to. In the meantime, if you are sick of the "ribbon" and you want to use old-style Word 2003 menus, there is a little bit of software out there called Classic Menus for Word 2007 from AddInTools which is supposed to customize Word 2007 so the menu looks like the old 2003 one. I cannot vouch for this software, but you can download the trial version and see if it solves your ribbon-related woes. And let me know what you think.

This site is still mostly concerned with the most common, previous versions of Word, but just a note regarding Word 2007, recently out as part of the Office 2007 package. It concerns the implementation of drop-down menus. Well in short, they are GONE!

We will be testing Word 2007 here on Word Tips World soon and will update when we have got a better idea of how it works, but the new interface is quite radically new, and might well pose some problems for existing users until they get used to it. First impressions are that the new replacement for drop-down menus, the "Ribbon", as Microsoft have dubbed it, IS a more logical approach - a kind of context-sensitive tab system. A bit like in Macromedia Dreamweaver, if you have used that.

I will just give you a quote from the Microsoft site for now (link to full article below):

"The primary replacement for menus and toolbars in Office Word 2007 is the Ribbon, a component of the Office Fluent user interface. Designed for easy browsing, the Ribbon consists of tabs that are organized around specific scenarios or objects. The controls on each tab are further organized into several groups. The Office Fluent Ribbon can host richer content than menus and toolbars can, including buttons, galleries, and dialog box content."

We will get back with a full overview once we have trialled the new replacement MS Word interface and see what the implications are for the world of Word Tips!

Microsoft Reference article: Locations of Word 2003 commands in Word 2007

Thursday, April 19, 2007

Increase or decrease font size in Word using keyboard shortcuts

You want to increase or decrease the size of the font in Word from, say, 10 to 12. What do you do? Reach over for the mouse and select a new font size from the drop-down menu? You should know better by now!

Highlight the text whose font size you want to increase/decrease (perhaps using some of the text highlighting tips I talked about previously!) and press the key combination

CTRL + SHIFT + > to increase font size by 1 point
CTRL + SHIFT + < to decrease font size by 1 point
(the < and > symbols MAY be on different keys depending on your keyboard layout - they are the two keys to the right of the M key)

On some versions of Word you can also use CTRL+ [ and ], which is even simpler!

This is such a simpler way of changing the font size, especially by just a few points, you'll wonder why you ever used the mouse. And the other cool thing is that you can use this to increase the font size by the same increment across your whole document - even if you have different font sizes in there they will be increased by the same amount, retaining relative sizes.

Wednesday, April 18, 2007

Good Word habits - save save save!

Forgot to save your Word document? You could try my article on this subject, but read the following advice first, and be prepared for the worst...

A habit I strongly recommend you get into is VERY regular saving of your Word document. I don't mean every hour, or once a day, I mean every other sentence!

What? That's a bit over the top, isn't it? Well, all I can say is that it is a LONG time since I lost anything more than a few sentences of a Word document, and I am happy to keep it that way! Ever lost a few hours' (or more) work because you forgot to save? You know what a downer that can be!

Sure, Word has an Autosave/Autorecover feature, which is supposed to bail you out, but for some reason it seems always to let you down just when you need it most! It's probably wise to make sure YOU are saving your document on a VERY frequent basis.

So how do we make sure we are saving our Word Documents regularly? My advice is get to know the keyboard shortcut CTRL+S very well! As soon as you create a New Document (using CTRL+N, of course!), even before you type ANYTHING in, press CTRL+S! You will be prompted for a filename and you can save your document immediately, before you run off 20 pages and forget to save it at all. Yes, it is quite OK to save an empty document, nothing bad will happen!

Now, this is the bit you need to turn into a habit: press CTRL+S as often as you can while typing your document in! Like I say, I do it practically after every sentence, and after a while it becomes second nature, to the extent you don't realise you are doing it anymore! This will ensure a very recent version of your document is always saved, and will drastically decrease the chances of your losing a large amount of work! It only takes a second for Word to save, it will not interfere with your work, and the CTRL+S shortcut is, again, much much quicker than using the mouse and clicking the toolbar button or (heaven forbid!) the Save option from the File menu.

Happy saving!

DISCLAIMER: Look, I can't PROMISE this will absolutely protect you from losing a document, so please do not rely solely on this method. You need to take all possible precautions, it's your responsibility to save regularly, and make regular backups, and you cannot later blame me, or say "Word did it by itself"! OK?! Also, a reminder of my article Forgot to save my Word document, which might help in a pinch.

Monday, April 16, 2007

Word keyboard shortcuts via drop-down menu

Note: if you came here looking for information about drop-down menus in the new Word 2007, or the lack thereof, have a look here! This article is about, er... something else!

A lot of commands in Word do not have a specific shortcut, unless you actually make one, or it is tricky to remember. But there is a way to eliminate excessive RSI-inducing mouse movement (and just stick to keyboard induced-RSI!) even with commands that you DON'T know the shortcut too.

One example is Insert comment. You do use this, right? Well, comments are used more often when, like me, you often edit or write (or translate) texts which are not for direct publication but are going to be read by others before they are finalised. The comments are not part of the text themselves, but float in a bubble, or appear at the bottom, depending on which View mode you are in, Print Layout or Normal.

Insert comment quickly with a "shortcut"
The default shortcut to Insert comment is CTRL+ALT+M, but you can do it like this too:

  1. Press Alt. A menu item is highlighted at the top of the page, and you can't type now - if you do, you will find yourself selecting menu items you didn't want! Accidental pressing of Alt, followed by other keys, is actually a common cause of the complaint "Word keeps doing things I didn't tell it to!"
  2. Now press I. You will see that the drop down menu with the underlined I, i.e. Insert, appears. This works all over Windows by the way - the underlined letters are shortcuts of a sort! More about that another time maybe.
  3. Now press the underlined letter for the Comment option, that being not C (who knows why, probably C is in use by some other menu item), but M.
Hey presto! (I say that a lot here - it's not really magic or anything!) You have inserted a comment! Once you use the quick key sequence

Alt -> I -> M

a few times it becomes second nature and saves a whole load of time and mouse movement, which is what we are trying to achieve here!


Do a word count quickly!
Here is another example, maybe you need this more often - press the sequence:

Alt -> T [Tools menu] -> W [word count]

Abracadabra! (There's another useful magic spell!) You have done a word count 50 x (at least!) quicker than hunting for it around the menus.

Many commands have a shortcut in Word, but even if you don't know it, you can use this method to navigate the menus at the top, select just about anything, and save on using the mouse. Just use ALT to activate the top menu, and then use the underlined letter of the menu option to select what you want.

Like all shortcuts and hints, it is much easier just to not bother with this, and keep doing things the way you always have, which is fine I guess, but with a little effort you can hugely improve your skill and speed in using Microsoft Word and other Windows applications and starting looking like a pro user!

Wednesday, April 11, 2007

Highlighting text in Word using the mouse, WITHOUT tracing the whole text

Here is another thing I see people doing in Microsoft Word and other applications all the time. They want to highlight a block of text using the mouse (we covered doing it with the keyboard for short, local sentences/words - here, so check this out too). They dutifully position the mouse at the beginning of the text they want to highlight, hold down the left mouse, and then sort of TRACE the whole text along until they get to the end!

In this video you can see, in the first part, an example of how people do this (oh wait, that's you!), and in the second half how do do it much quicker just by MOVING the mouse to where you want!


See?! You DON'T have to trace along with the mouse, you can just move it to the end, or even move it about wherever you want! You won't break it, really! And this is true for any Windows application - you don't actually need to highlight each letter in turn, Windows is clever like that, it knows you want to highlight everything between the start and end too!

Once again, if you think this is blindingly obvious, well, you're reading the wrong blog then - go and read Word Genius World!

Wednesday, April 4, 2007

Using SHIFT and CTRL together in Word to highlight whole words

OK, this is where it gets exciting! If you've just joined us, WTW's mission is to serve up basic, but incredibly useful tips on using Microsoft Word. The goal is to help people who may have been using Word, maybe even for years, but have never really gone beyond using SPACE to format things (a really nasty habit!) There are lots and lots of time-saving hints on using Word of which advanced users will say, "that's obvious!", but I assure you, it isn't!

Today I want to combine two previous tips: Skipping words with CTRL and Highlighting words with SHIFT. If you didn't catch those, check them out now, and then come back here!

Again, what I see an awful lot of people doing is using the mouse unnecessarily (it slows you down and can cause back and arm trouble in the long term!), in this case to highlight words, even if these words are ones in the same sentence, or nearby. You don't need to! As we learned, you can

1) Quickly reach the word you want using CTRL + cursor keys
2) Highlight letters using SHIFT + cursor keys.

Well, now try both together! Type a short sentence, then press CTRL + SHIFT and, say, the left cursor key.

Abracadabra! Your text gets highlighted a whole word at a time, and you can either hold down the cursor, which can rapidly highlight multiple words, or press it repeatedly, to highlight one word at a time.

Either way, this is a really simple, but incredibly useful way to copy/paste text that you have recently typed. Go on, try it now! Do it a few times, and it will become second nature, trust me!

Tuesday, April 3, 2007

Highlighting words with Shift in Word

You can use the Shift key in Windows (and Word of course) to highlight letters and words, without reaching over for the mouse. Really simple, but again, not a lot of people know it!

Just press Shift at the point you want to start highlighting and move the cursor keys! Voila! Your words get highlighted letter by letter, which is great if you need to highlight the word you were on and far quicker than using the mouse.

Next time we are going to combine this with another recent tip, making it even more usable! Stay tuned!

Monday, April 2, 2007

Skipping words with CTRL

This is really simple too, but it is surprising how often people are not aware that they can use CTRL to move around from word to word in Word (erm, follow that?!) Actually in more or less any Windows application.

Example - you are typing a sentence, realise you made a mistake a few words back and want to move there to correct it. Oops. I have just realized I want to go back in the last sentence and change the spelling in the word realise to the American spelling!:

You are typing a sentence, realise you made a mistake |
The cursor is after the word "mistake", so how do you get back to the word realise? You can either strain your arm reaching for the mouse, or I see a lot of people moving back with the cursor one letter at a time, which takes ages.

But hold down CTRL while using the left and right cursor keys and, hey presto, the cursor jumps a whole word at a time! Once you get used to using it, it seems silly to stab away at the cursor keys, or use the mouse and you'll wonder how you did without this simple feature!

Really obvious? Everyone knows this? Nope, if you did know this, then you're probably reading the wrong blog, but there are plenty of people out there who have just heard this for the first time! And to them I say, free your mind, and get skipping those words using CTRL!

Thursday, March 29, 2007

DO NOT USE SPACES TO FORMAT TEXT IN WORD!!

I am sorry to shout, but I have to emphasize this, because this is the sin of all sins! I received a document from a client just yesterday which was formatted in this way, and I very nearly refused the job, just because of the extra hassle in processing the file. I will certainly be charging more in the future, and let me also say, any CV/resume I get formatted in this way, in which the applicant claims to know how to use Microsoft Word, GETS BINNED!

What people do is if they want, say, a price list that is indented, with the price following, they do this:

...and use the spacebar to make the spaces in between. And then when you have more than one item you get this:


The columns don't line up, it looks awful, you cannot edit it easily after that, and these are only SOME reasons not to commit this heinous crime! I can name plenty of others, but can I repeat again, you must NOT do this! There are LOTS of good ways to get your text spaced out like this, AND for it to line up in columns.

The easiest way is to use TAB. That is not ideal either, but it is better than using spaces!

Just press TAB however many times you want to move the text across and it will move each time, lining up with "imaginary" (actually, you can define them) ruler lines.

An even better way (THE way, in my opinion) is to use a TABLE. Just insert a table (Table -> Insert -> Table), specify the number of columns you want, and enter, say, the menu item in the first column and the price in the second column.

But wait, you say, you don't want the lines of the table showing. Well, just use the borders options on the toolbar:


... and just turn off all the borders by marking the whole table and using the second icon on the bottom row.

If you can still see faint gridlines, these are just indicators of where the border lines would be. You can turn this off too - it's under the table menu - Show Gridlines.

THIS looks SO much more professional.

...and you can change the spacing, copy individual columns, easily add another column with the same width...

Now, repeat after me,

I...
will...
not...
use...
spaces...
to...
format...
things...
in...
MS Word.


Thankyou.

Wednesday, March 28, 2007

Keyboard shortcuts for Center and Right and Left Justify

This is really simple, but it is amazing how few regular Word users actually know this!

If you want to centre, or right or left justify your text, chances are you will reach over to your mouse and head for these icons at the top, right?


Well, this is a very laborious way of doing it - why use the mouse at all, just learn the shortcuts!

CTRL+E to CENTRE JUSTIFY
CTRL+L to LEFT JUSTIFY
CTRL+R to RIGHT JUSTIFY

The first one isn't maybe so logical, but you will soon learn it. The second two are easy to remember. The only strange thing is that because L is to the RIGHT of R on a QWERTY keyboard, and if you're like me, you will sometimes confuse the two! But then I can never remember which is left and which is right when I am crossing the road, so that is hardly a good indicator...

Capitalize words and sentences EASILY

Imagine you have a sentence in Word:

Microsoft Word allows you to change a sentence into all caps with one keyboard shortcut

But you suddenly realise you need it all in caps. How are you going to get it into capitals? Surely you weren't thinking of retyping the whole thing in?!

The shortcut SHIFT+F3 is what you need. Just highlight the text (no need to use the mouse for this, but more about that another time!) and press this key combination and you will see the text cycle from the original, to this:

MICROSOFT WORD ALLOWS YOU TO CHANGE A SENTENCE INTO ALL CAPS WITH ONE KEYBOARD SHORTCUT

with one keypress!

By the way, if you press SHIFT+F3 again, you will get this:

microsoft word allows you to change a sentence into all caps with one keyboard shortcut


...and if you press it again, you get:

Microsoft Word Allows You To Change A Sentence Into All Caps With One Keyboard Shortcut


This is not that useful as we do not usually capitalize sentences like this in English, especially not the words like "a, the, to" etc. But if you wanted just to capitalize the first letters of "microsoft word" for example, this would be the ideal way to do it!

So once again, that's SHIFT+F3! Why not give it a go now?

Word Tips World

I have been planning to start this blog for ages. I use Microsoft Word an awful lot, and though there is still MUCH that I do not know about this hugely popular word-processing package, I do know a lot of tips and tricks that greatly speed up my use of Word.

I am no Microsoft Word guru, I do not have all the secrets, but the tips that I pick up every now and then, I would like to share with you.

So watch this space, use the tips, and see your productivity in Microsoft Word greatly increase!
Close

You are TOO SLOW in MS Word!

Word pro video

Watch how fast this pro uses Microsoft Word™! (VIDEO) - CLICK HERE) and find out how you can massively boost your productivity in MS Word just by learning a few simple "secrets" (our cheat-sheets and video reveal all :))