Thursday, September 30, 2010

How to stop losing files.


I want to tell you about a service that's for slackers like me who only think of making backups AFTER losing their files!

Does that sound like you too? You say yeah, yeah, I know I need some kind of back-up in place - (I especially couldn't afford to lose all my extremely important, irreplaceable Word documents!) I'll get round to setting that up sometime. But it's just too much hassle right now, it's a lot of work to set up and anyway, what are the chances of my accidentally losing a file?

You are probably like me. Maybe you have even just experienced losing a file and come here looking for a way to stop it happening again.

Well, a service like Mozy was just what the doctor ordered for people like me (and, I suspect, you).

Mozy

Stop losing files, dummy!!

Now here's how I see backup - I am a keen mountain-biker. To me putting off getting a backup solution is like not wearing a helmet on my bike. When I finally need it (as I am falling off my bike), it's too late to put it on! It's the same with your precious files. AFTER losing a file it is TOO LATE to start thinking about backup

Mozy makes it about as easy as it can get to finally, automatically, easily get your files in a safe place and reduce the chances of losing a file to a minimum - backup for dummies, you might say (or the chronically lazy, like me).


How Mozy stops you losing files

Mozy is a highly automated backup system that you can set up and forget! It will run in the background of your computer, transferring files to online storage, transparently to you, the user. You needn't even think about it - until you lose a file, that is!

Mozy has a couple of interesting options:

1) Unlimited online backup for only $4.95 a month, meaning you can literally store ANY amount of data you want (yes, as much as you want, or so they say!)
2) A 2GB free storage option, which is basically like a free trial (though with no time limit), where you always have the option to upgrade if you run out of space. 2Gb isn't nearly enough for me, but certainly enough to get a feel for the system.

So I decided to check it out. To begin with I signed up for the free package. I want to see how it works first. If it stops me potentially losing valuable files, I see NO problem paying a measly $5 a month, especially for unlimited storage! (do they KNOW how many files I have!?)


Here is what happens when you sign up for the free 2Gb trial of Mozy:

1) First you supply your email and choose a password (remember both!)

2) Answer a few survey questions about the industry you work in. I guess that's a fair trade-off for the free storage!

3) Wait for a confirmation email, which actually took unusually long for me - (well, about 10 minutes!)

4) Click on the link in the email. This confirms your membership and also takes you to a download page for the MozyHome client.

5) Download the MozyHome client appropriate to your system (Windows, Mac etc.) and install it.
6) You will be asked to enter the email and password you chose earlier.

7) The program scans your hard disk for different types of file and then asks you which types of file you would like to back up (for example, you can just opt to back up documents). This is one bit I didn't like hugely, it's a little dumbed-down. I wanted to choose which folders to back up myself. If you do too, you should just quit this step and right-click on the new Mozy tray icon and choose settings. Then you can go to the File System tab and manually choose which folders to back up, making sure not to go over your 2Gb quota if you have opted for the free trial. There are lots of other interesting options, but the defaults are fine for now.


...and that's it!
After this, Mozy will work away in the background, initially transferring all the files you selected to the online service. That can take a day or so at least, even for less than 2 gigs of files, due to our typically slow upload speeds.

Mozy will then stay on your desktop, continuing to work in the background and only transferring those files that have changed, totally transparently to you. If anything goes wrong in your everyday work and you end up losing a file for some reason, then Mozy starts to really pay for itself - you can use the Restore Files option to download the file you lost from the online storage service (and you have a whole month to notice you lost the file, that's how long they keep them).


Conclusion

Easy as pie! I've got Mozy chugging away right now in the background as I type this, and I feel a lot better for it, let me tell you! I will almost certainly be upgrading to the Unlimited Storage option, as I have many gigs of files that I don't want to lose, and they are worth MUCH much more than $4.95 a month!

There is plenty more to say than that, but I hope that gives you an idea of how Mozy can prevent you losing files ever again!

Give it a go, you might as well, because the 2GB free storage option is free! Or maybe you want to go straight in with the unlimited online backup option for only $4.95 a month - you can always cancel if you are not happy, though I think you will be, especially the first time you recover a lost file!

The way Backup Should Be FREE!

Sunday, September 26, 2010

Word 2003 bye-bye?

If you have been following Word Tips World for a while you will know that I have religiously kept the tips limited just to those that are about Word 2003, which at the time I started the blog (2007) was still the most common version around. Word 2007 (Office 2007) had come out, but most people (including me) hated the new 'ribbon' and were perfectly happy using Word 2003 and earlier version.

Times have changed gradually, Word 2007 has given birth to 2010 and to be perfectly honest, though I personally still don't like the 'Ribbon', I think I am ready to move over to Word 2010, at the same time I migrate to Windows 7. There ARE serious bugs in Word 2003 that affect my productivity and I guess clinging tenaciously to an out-of-date product just isn't the sign of a mature personality!

But I don't want to take a final decision without asking you the reader. So come over to the site (if you are an email or RSS subscriber) and leave a comment on this article, and also vote in the poll you see on the right-hand side, which will run for around a month, and let me know, which is it to be: Yes, Office 2003 should be put out to pasture and we should move on to Word 2010 or No, never, I would rather die than move over to Word 2010 and The Ribbon!

I will consider your opinions and votes in taking a final decision. Thanks!

Saturday, October 17, 2009

Copy-pasting text from web pages without messing up formatting

Perhaps like me you often copy-paste text from web pages into your Word documents. For example, I am currently involved in a translation project that includes a lot of Bible verses. I am obviously not going to type these in from scratch every time, rather, I will copy-paste them from Bible Gateway of course.

Only problem is, the verses on Bible Gateway are formatted in a different family and size of font from my Word document, so when I paste them in to my doc, it does so in the source font and I then have to change the font, size etc. which is a pain. Also, there is a danger when copying from a web page that you will also copy across HTML tags that won't be visible, but could play havoc with your documents later.

So you need to use Paste Special instead of just CTRL-V (you DO use keyboard shortcuts to copy-paste I hope! CTRL-C to copy, CTRL-V to paste!). Paste Special is up on the Edit menu in "normal" versions of Word. If you are using 2007 onwards, sorry, can't help you, but I am sure it's there somewhere in the famous "ribbon"!

Copy your text from your webpage, then go into your Word document and select Paste Special. You will see a dialogue come up and, without worrying too much about all the options, just select Unformatted text and OK (or just double click it). Hey presto, the text is pasted in the same font as the text you were working on at that moment. By the way, this tip applies to any source of formatted text, not just web pages.

The only problem with this is that it is more cumbersome than just pressing CTRL-V, and there is no keyboard shortcut for "Paste unformatted" - you have to navigate up to the appropriate menu with the mouse, or learn the key sequence as I explained here. However, if you feel you are up to it, Microsoft's site has an article explaining how to write a macro to do this.

Happy pasting!

Saturday, January 17, 2009

Stop the annoying horizontal line in Word

One of the most-read tips on this blog is still "Get rid of that annoying horizontal line in Word", which means that problem is still bugging people out there.

It's a "feature" of Microsoft Word, whereby annoying horizontal lines appear in your document and you can't get rid of them. The post above describes how to remove those lines, but there is also a way of stopping (some of) them from appearing.

AutoCorrect creating The Line
Sometimes they are created by Word's often useful, sometimes infuriating AutoCorrect feature. If you type a line of 3 or more equals signs, underscores, minus signs, and probably a number of other chracters, Word automatically converts this to a line running across the screen, which isn't actually a line but a border, which is why we have trouble getting rid of it. You can just about see why someone might want to use this shortcut, but it seems to have caused more confusion among Word users than anything, all things considered.

The way to stop this is simple - go to Tools -> AutoCorrect Options and select the AutoFormat As You Type tab. Uncheck the option Apply as you type -> Border lines and never see that feature again! (until you reinstall Office at a later date and forget what you changed!)

Wednesday, March 19, 2008

The Word LifeSaver - never lose a Word document again!

"Never lose a Word document again!" (hopefully)

If the Word LifeSaver saved your life, or at least your Word document, consider making a donation to help with the upkeep of this program. Thanks.


Download v0.3 of the Word LifeSaver here - FREE (compatible with Word 2003 - not tested with other versions, please let me know if you have tried Word 2007 or others)

NOTE ADDED: 22nd July 2008 - there is a "slight" loophole in the program - you COULD still exit Word using File -> Exit, or by clicking on the 'X' at the top right of the window. Thanks to a user for pointing that out. Unfortunately, I have not yet found a way of intercepting Word's Exit 'event' (actually, there seems to be no Exit event in Word Visual Basic - help programmers!) but if I manage to work it out I will post a new version of course. So, yes, this does diminish the functionality of the program a tad, but you could still find it a LifeSaver..!

The background
You know that moment? The moment when you are exiting Microsoft Word and the program asks you Do you want to save? In your haste you automatically press NO, realising a split second later, with horror, that you DID want to save, and that you have just lost 10 minutes's/an hour's/a day's work!

Usually in this situation the document is lost for good! I know you know about this because this is the most popular article on this site!

Word LifeSaver - how it works
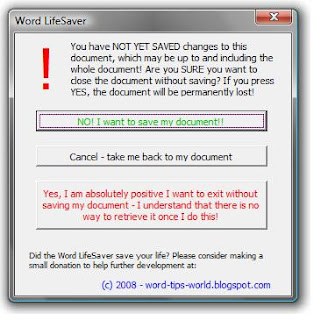
To stop this happening, you need the Word LifeSaver! It is a little routine which you install in Word which STOPS you from easily closing a document that you haven't saved. If you try to close a document with unsaved changes in it - and these can represent a few seconds typing, or a whole day's work! - Word will still ask you Are you sure...? If you go ahead and press NO the document will NOT close, losing all your work forever. Rather, you will be presented by this rather wordy but, I hope you will agree, useful dialogue:

This is your chance to say NO! and save your document.

If you should press YES, well - there might just be one more chance, but let's hope you don't need that, eh?

Word LifeSaver - how to install
1) Hopefully you have downloaded LifeSaver v0.3.

2) Unzip it, but DO NOT run it.

3) Open Word 2003. Go into Tools -> Macros -> Security and set the security level to Medium if it is set higher than that. You must do this - LifeSaver is written in Visual Basic and won't work otherwise!

4) Now go to Open and find the file you unzipped - WordLifeSaverInstall.dot. Open it. If you are asked whether you want to enable macros, click Enable.

5) Follow the on-screen instructions and... that's it! The rest is explained in the file, hopefully.


How to uninstall


1) Navigate via the toolbar through: Tools -> Macro -> Macros -> Organizer

2) Choose the Macro Project Items tab and look at the list in the In Normal: box, on the left.

3) You need to choose three macros from that list and delete them with the Delete button. These are:

  • DoubleCheckSave
  • LifeSaver
  • SureCloseDialog
Once these are gone, the macro should no longer work.

Please read the instructions fully, as well as the disclaimer and the license. The program is free to use and distribute, donations are always gratefully received if this program helped you, and most of all I would love to hear if you found this program useful, or if you found any bugs in it (highly likely) - so let me know in the comments below.

Friday, February 29, 2008

Inserting non-standard characters in Word using ALT-number pad

A while back I wrote a couple of articles about inserting non-keyboard symbols in Word using the Insert Symbol function, and also by using some default shortcuts.

Now we get onto the real voodoo - using ALT and the number pad to produce some non-standard characters. You do have a number pad, don't you? That was one of the essential features I insisted on when I got my Toshiba laptop - unless you REALLY need high portability, you ARE going to miss the number pad at times...

How to use ALT and the number pad to produce non-keyboard characters
All the characters you need CAN be inserted into your document using the Insert Symbol function in Word - say the ² (squared) symbol, the µ (Mu or micro) symbol, or the ¼ and other basic fractions. But what if you use them frequently? You don't want to have to go into Insert symbol every time.

Well, this is how you do it: first go into Insert symbol and select one of the above-mentioned symbols (this is by way of example - not all the symbols are inserted this way, so choose one of those for now). Click on the symbol once, say µ . At the bottom it says: Shortcut key: Alt+0181. What's that all about?

It means:


1) Make sure the NUM LOCK light is lit on your keyboard - if not, press it once to activate the number keypad
2) Press the LEFT "ALT" key (it doesn't work with the right!) and hold it down.
3) While still holding the left ALT key, type 0181 in sequence on the number pad (it only works on the keypad too!)
4) Let go of the ALT key and... the µ symbol magically appears!

Other ALT codes
Many other symbols have these codes, and believe it or not, you CAN learn these by heart if you use them fairly regularly - you don't want to have to go back to Insert symbol every time, after all, that would defeat the object somewhat! I have a number of these codes that I use without thinking, such as the „ and ” I need in Serbian - you can't get those via the keyboard.

Here are a few more symbol ALT codes:

½ (half symbol) - ALT+0189
¾ (three-quarters symbol) - ALT+0190
÷ (division sign) - ALT+0247
† (dagger) - ALT+0134
§ (section) - ALT+0167
± (plus-minus) - ALT+0177
¥ (Yen) - ALT+0165

Oh, and I'll let you into a little secret! These shortcuts are not exclusive to Word - in fact they work in all Microsoft and most Windows programs. In fact, I used them to type the symbols here.

Thanks for tuning in to Word Tips World again, and for letting us into your inbox if you are an email subscriber. Stay tuned, for one more bit of symbol-inserting voodoo, coming soon!

Wednesday, December 5, 2007

Inserting symbols in Word, continued

Recently I wrote about inserting symbols in Word using the Insert symbol function. I also mentioned that there are keyboard shortcuts for some common symbols, like © (copyright symbol) (ALT+CTRL+C) and it's well worth learning them, it can really save you some time! Here are a few more:

® (registered trademark symbol) - ALT+CTRL+R
¢ (cent symbol) - bit more tricky, hold CTRL and press /, then press c whilst still holding CTRL!
° (degree symbol) - hold CTRL and press @, then press space

By the way, these can depend on what keyboard you have - mine is not an English one, so to get @ I have to press shift too!

But we still haven't got onto those symbols that are inserted with ALT+xxxx (a four digit number) - we'll leave that for next time!


Close

You are TOO SLOW in MS Word!

Word pro video

Watch how fast this pro uses Microsoft Word™! (VIDEO) - CLICK HERE) and find out how you can massively boost your productivity in MS Word just by learning a few simple "secrets" (our cheat-sheets and video reveal all :))